Warning: Use of undefined constant title - assumed 'title' (this will throw an Error in a future version of PHP) in /data/www.zhuangjiba.com/web/e/data/tmp/tempnews8.php on line 170
win7系统注册表损坏无法启动解决方法
装机吧
Warning: Use of undefined constant newstime - assumed 'newstime' (this will throw an Error in a future version of PHP) in /data/www.zhuangjiba.com/web/e/data/tmp/tempnews8.php on line 171
2021年03月18日 15:09:00
在日常使用电脑的过程中,偶尔会出现以下问题,最近就有网友遇到了win7系统注册表损坏无法启动的情况,那么win7系统注册表损坏无法启动怎么办呢?很多朋友不自知所措,下面我来介绍win7系统注册表损坏无法启动解决方法。
win7系统注册表损坏无法启动解决方法如下:
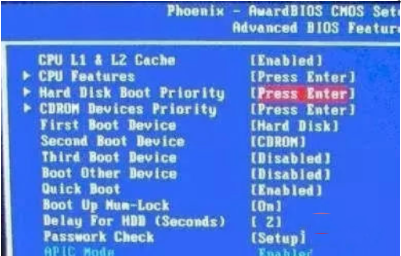
1、在电脑启动时,按DEL键或F2键进入BIOS界面(不同主板的启动BIOS按键不一样,具体请查看电脑启动时屏幕下方或在百度搜索一下)。不同主板的BIOS界面会不一样,下面以2010年之后主流Phoenix-AwardBIOS主板为例,选择高级BIOS设置Advanced BIOS Features。
2、在弹出的界面,选择Hard Disk Boot Priority。

3、通过键盘上的上下键选择USB-HDD(U盘即可,会自动识别我们插入电脑中的U盘),选择USB设备为第一启动项,按Entel键确认选择,再按F10键确认保存。

4、重新启动电脑进入U盘小系统。按win+r键,输入cmd,打开dos命令窗口。

5、在dos命令行中执行以下命令:
copy C:\windows\system32\config\RegBack\* C:\windows\system32\config
将系统备份注册表还原。
6、重启电脑,如果是注册表损坏造成的开不了问题便应该能解决了。
以上就是小编带来的win7系统注册表损坏无法启动解决方法的全部内容,希望可以提供帮助。
喜欢22